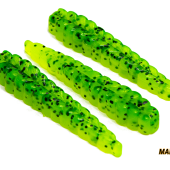
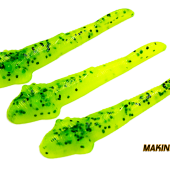
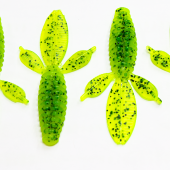
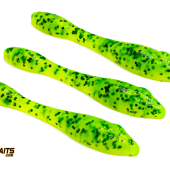
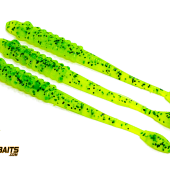
The appeal of Chartreuse Pepper as a soft plastic bait color is evident the moment it hits the water—its bright, bold green practically glows, capturing attention even in the most challenging conditions. The inclusion of small black flakes adds a hint of natural texture to the bait, mimicking the appearance of smaller prey species while giving the lure a "peppery" finish. What sets this color apart in the realm of soft plastics is its remarkable visibility, which works exceptionally well in stained to murky water, as well as its universal appeal to a variety of freshwater and saltwater gamefish.
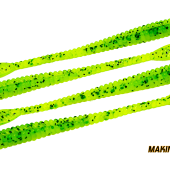
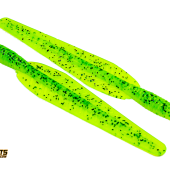
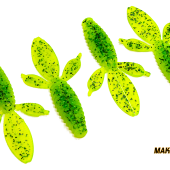

You know, it's funny how some colors just have that magic touch, and for me, Chartreuse Pepper is that color. I've caught more large-mouth bass using a 5-inch stick bait in this color than with any other bait in my tackle box. When remaking this color I like to stick close to the original Chartreuse Pepper that Wave Worm used in their Tiki Sticks in the early 2000's. Their version was a little more on the lime side of Chartreuse, but not full a full-on Limereuse like you might find in a Zoom trick worm.
Recipe Notes
- For a more lime-colored bait, use 35 drops of the Chartruse colorant, and step up to 15 drops of the Neo Lime colorant.
- If you prefer a more traditional Chartreuse Pepper color, omit the Neo Lime colorant, and use between 30-50 drops of the Chartreuse colorant, adjusting for desired color saturation.
- For a slightly different presentation add 5-15 drops of Dead On Plastics Opaline Green liquid colorant. This will add a green “sheen” to the bait.
- Neo/Fluorescent colorants can lose some of their vibrance and unique properties when overheated. Just like with string-cut flake, check the plastisol's temperature before adding the colorant.
Recipe Instructions
- Base Setup: Use 1 cup of your preferred brand and hardness of plastisol. Shake or stir in the original container until the plastisol is uniform in color to avoid curing issues.
- Oil-Based Additives: If required by the recipe, add any oil-based plastisol additives at this stage. This includes hardener, softener, or heat stabilizer.
- Initial Heating: Heat plastisol in the microwave in 1-minute intervals until plastisol starts to turn clear. Check temperature and continue heating in 15-30 second bursts. Monitor temperature after each round to ensure the plastisol reaches the manufacturer's recommended “cooking” temperature. (Usually 350°F) Try not to overshoot this temperature by very much.
- Scorch Warning: If the plastisol's temperature exceeds 380°F, it will begin to scorch and could burn. If this is the case, vacate the area due to toxic fumes, and return only after adequate ventilation has occurred.
- Degassing: If your plastisol requires degassing for bubble prevention, complete this step now.
- Colorant and Pigment: Integrate liquid colorants and powdered pigments, ensuring a thorough mix for at least one minute to eliminate color streaks.
- Flake / Glitter: Cautiously add flake, taking note that high temperatures can cause it to curl or bleed. Flake may also alter the bait's color.
- Dry Additives and Salt: Add any remaining dry plastisol additives, including salt if necessary. Be aware that salt can introduce bubbles and lighten the bait’s color.
- Final Temperature Check: Ensure the plastisol is at your desired injection or pouring temperature, typically somewhere between 280°F and 320°F. Make temperature adjustments in 10-15 second increments in the microwave if necessary. Note that some glitter will bleed and curl at temperatures over 320°F
- Mold Injection/Pour: Proceed to inject or pour into molds, observing all safety guidelines
Soft Plastics Safety
- The working temperature of plastisol is upwards of 350f on the extremely high-end with scorched plastisol reaching temperatures of 400f or higher. Plastisol releases chlorine gas and other toxic and nauseous fumes that are extremely hazardous to humans when heated to its scorching point. Proper PPE is required at all times when working with Plastisol.
- Be aware that hot plastisol, when spilled onto flesh or clothing, almost always results in a 3rd degree burn, and it’s important to wear closed-toed shoes, long pants, and long sleeves when working with plastisol. Additionally, a good pair of leather, heat-resistant gloves are required at all times to protect your hands from very severe burns.
- It’s important to remember that hot plastisol is the consistency of extremely sticky glue, and it is impossible to wipe off, pull off, or throw off any hot plastisol that might spill on your skin or clothing. The resulting burn is instantaneous, so always work with your skin covered, and protected.
- For all of these reasons and more, you should always wear proper PPE when working with plastisol. This includes, at a minimum, eye protection, an air-purifying respirator, and skin-covering clothing. Consult the manufacturer’s literature and the plastisol’s MSDS sheet to familiarize yourself with the chemicals you are working with, and when in doubt, give the manufacturer a call and ask about their safety recommendations.
- It’s also important to always work with plastisol in a well-ventilated area, with some form of airflow moving the plastisol fumes away from you and out of the area.
- Making Baits is not an authority on bait-shop safety, but we use the following PPE items when working with plastisol in our bait shop. Attempt anything you see on this website at your own risk, and please do additional research on how to work safely with plastisol. When in doubt, contact the manufacturer for their safety guidelines.
What We Wear In The Bait Shop- Closed-Toed Shoes
- Long Pants
- Long-Sleeved Shirt
- Leather Heat-Resistant Gloves
- Organic Vapor Respirator
- Safety Glasses
- Proper Work Space Ventilation
Join the Making Baits Community!
Share your bait creations with us on social media and join various bait-making communities. We'd absolutely love to see the fantastic baits you've crafted! Share your bait masterpieces with our community by tagging us on most platforms with @MakingBaits and #WeLikeMakingBaits.
Follow Making Baits On:
- YouTube
- TikTok
- X.Com (Twitter)
- Rumble
- Locals
- Support Our Bait Making Content via a donation.
Bait-Making Facebook Communities for More Education and Inspiration:
- We Like Making Baits Facebook Group
- Open Pour Molds and Techniques Facebook Group
- Soft Plastic Bait Makers Facebook Group
- Dead On Plastix Deadhead Nation Facebook Group
Join these groups to ask questions, share your bait photos, or just enjoy fellowship with other bait makers. Dive into discussions, learn from the experiences of others, and contribute your insights into the bait-making process and the business side of things.